Your First Chaos Engineering Experiment With ChaosToolkit
1. Overview
With the advances in large-scale distributed applications, engineers have to deal with systems that grow more complex every day. Controlled chaos engineering experiments can help any organisation identify potential weaknesses and improve the resiliency of their systems.
Chaos Engineering is the discipline of experimenting on a system in order to build confidence in the system’s capability to withstand turbulent conditions in production.
Getting started with Chaos Engineering can be overwhelming. We all hear the cool stories of how Netflix and Google and some other tech giant runs experiments on production, but that is the result of a long journey and not at all where they started.
In this article, I’ll explain that practising Chaos Engineering is not about using complicated and expensive tools. It’s about understanding a few principles and using them to design experiments that will help you understand the limitation of your system, whether it’s a production environment or even your own laptop.
2. Before We Start
In this article, we’ll learn how to design your first chaos engineering experiment using the OpenSource framework ChaosToolkit.
If you want to follow the steps described in this article, you first need to ensure Docker and Python3 are installed in your system.
Install Docker
If you’re reading this article, you are probably already familiar with Docker, but don’t worry if you’re not. Head over to the Docker documentation and follow the installation steps for your system.
Install Python3 and Pip
ChaosToolkit is a Python application and needs a Python interpreter to run. Most systems today have a Python version pre-installed.
You can verify what Python version you have by running this command in your terminal:
# python3 --version
Python 3.11.3
Any Python version >=3.7 should be fine to run ChaosToolkit. In case the command above does not return any version number, follow the steps below to install Python:
On Windows:
You can download the Python binary installer from the official website.
On MacOs X:
# brew install python3
On Debian/Ubuntu:
# sudo apt-get install python3 python3-dev
3. Design Your First Experiment
The best way to get started with Chaos Engineering is to dip your toe into the water and create your first experiment!
We don’t need to deal with the complexity of a production system or even to set up convoluted applications and databases. As long as we understand and practice the Principles of Chaos we can learn chaos engineering using our local machine.
3.1. Start by defining a ‘steady state’
The first step is to define a hypothesis of a stable system. There’s no general rule to describe what ‘steady state’ means, so for this experiment we’re going to hypothesise that our stable system should always have an Nginx web server running in the background.
This is as simple as running an nginx container in Docker:
# docker run -d --name webserver --publish 8080:80 nginx
We hypothesise that the web server should always be available in our local environment and listening on port 8080. You can verify it from the command line or by navigating to http://localhost:8080 using a web browser:
# curl http://localhost:8080
<html>
...
<body>
<h1>Welcome to nginx!</h1>
...
</html>
Great! Now we have a hypothesis. The next step is designing an experiment to disprove it! 💥
4. Prepare The Environment
To create an experiment using ChaosToolkit, we first need to install it. I recommend that we install it in a Python virtual environment. A virtual environment will make sure the application is installed in an isolated context from the rest of your system.
When we create a new virtual environment, Python will generate a new self-contained interpreter in a specified directory. To create it:
# python3 -m venv ./venv
As a result, a new venv directory should appear in the current path. To activate the virtual environment, use the following:
On Linux/MacOs
# source venv/bin/activate
On Windows
# venv/Scripts/activate.bat
Now we can install ChaosToolkit with Python Pip:
# pip install -U chaostoolkit
Verify the installation was successful by running the following:
# chaos --version
chaos, version 1.15.1
5. Create The Experiment File
We create a new file to host our ChaosToolkit experiment called webserver-running.yaml and add the following content:
title: "Verify Nginx web-server is always running on the system"
description: |
    An experiment designed to learn if our Nginx web server can
    self-heal even after the server fails unexpectedly

# Experiment-specific configuration
configuration: []

# Verify the system's steady state
steady-state-hypothesis:
    title: "Ningx web server is available"
    probes: []

# Introduce chaos, change initial conditions
method: []

# Restore system's original state, if necessary
rollbacks: []
You can use this template for any of your ChaosToolkit experiments and then customise the sections you need.
You should know that ChaosToolkit accepts experiment templates in json or yaml format. I prefer the latter because it’s more concise and allows comments, which are extremely useful for documenting your work, as you can see in the example.
5.1. Define the ‘steady state’ verification
We can instruct ChaosToolkit to automate the steps required to run the experiment using two building blocks: probes and actions.
- We use probes in the experiment to inspect or measure the system’s state.
- We use actions to vary the system’s state to simulate real-world events, like server crashes, hard drive malfunctions, network connection issues, etc.
For the ‘steady state’ verification, we use probes to query the system’s state. In our example, this means to verify the Nginx webserver is always running in the background.
Let’s modify the template by changing the steady-state-hypothesis section:
steady-state-hypothesis:
  title: "Nginx webserver is available"
  probes:
    - type: probe
      name: "server-must-respond"
      tolerance: 200
      provider:
        type: http
        url: "http://localhost:8080"
        method: "GET"
        timeout: 3
[] where you replace values.
You'll start getting strange errors otherwise... It happened to the author many times 😅
We just added a new probe to the steady-state-hypothesis to verify the webserver is running. Let’s break down how it works:
- type: This field can be either
probeoraction. We’ll define an action later on to modify the system’s state - name: A short name for the probe or action
- tolerance: Specify what return values of a probe are acceptable for a successful hypothesis verification. Supports numbers, strings or ranges.
- provider: Define the type of verification to run and its parameters.
Don’t worry if this seems like a lot to process. For now, I just want you to focus on two things:
# The value for the tolerance is 200, as the HTTP status code that represents
# a successful request to the webserver
  tolerance: 200

# This probe uses an 'http' provider available out of the box in ChaosToolkit
# and we can use the 'url', 'method' and 'timeout' to tell the experiment
# how to make the request to Nginx
  provider:
    type: http
    url: "http://localhost:8080"
    method: "GET"
    timeout: 3
If you want to learn more about all the different providers you can add to a chaos experiment, feel free to have a look at the ChaosToolkit API reference.
5.2. Run the experiment verification
At this point, we can run the webserver-running.yaml experiment with ChaosToolkit to make sure the steady state verification works. We can do that using the following command:
# chaos run webserver-running.yaml
And the output should be something like this:
[... INFO] Validating the experiment's syntax
[... INFO] Experiment looks valid
[... INFO] Running experiment: Verify Nginx web server is always running on the system
[... INFO] Steady-state strategy: default
[... INFO] Rollbacks strategy: default
[... INFO] Steady state hypothesis: Ningx web server is available
[... INFO] Probe: server-must-respond
[... INFO] Steady state hypothesis is met!
[... INFO] Playing your experiment's method now...
[... INFO] No declared activities, let's move on.
[... INFO] Steady state hypothesis: Ningx web server is available
[... INFO] Probe: server-must-respond
[... INFO] Steady state hypothesis is met!
[... INFO] Let's rollback...
[... INFO] No declared rollbacks, let's move on.
[... INFO] Experiment ended with status: completed
As a result of the experiment run, ChaosToolkit will generate two files by default:
- The
chaostoolkit.logcontains the same log lines that you see in the terminal - The
journal.jsonis a JSON report of the experiment execution
The journal.json contains information about everything that happens after you run the experiment. Open the journal file with your favourite editor and have a look inside.
{
  "experiment": {
    ...
  },
  "status": "completed",
  "deviated": false,
  "steady_states": {
    "before": {
      "steady_state_met": true,
      "probes": [ ... ]
    },
    "after": {
      "steady_state_met": true,
      "probes": [ ... ]
    },
  },
  "run": [],
  "rollbacks": [],
}
I’ve removed a lot of data from this file, but here’s the main takeaway:
- The experiment section contains the entire experiment definition in json format
- status contains the overall result of the experiment
- deviated indicates whether the system’s stable state has changed after running the experiment
- steady_states has two entries: before and after. This means ChaosToolkit has verified the hypothesis at the start and the end of the experiment
- run and rollbacks will contain the execution report for the
methodandrollbackssections of the experiment after we implement them
5.3. Introduce a Chaos Event
Now that we have a working hypothesis verification, we can modify the experiment to change the system state. To do this, we will add a process action to the experiment method. Modify the method section in the expeirment as follows:
method:
  - type: action
    name: "terminate-nginx-service"
    provider:
      type: process
      path: "docker"
      arguments: "exec webserver nginx -s quit"
As you can see, the structure of an action is almost identical to a probe, except this time we want to modify the system state by simulating an Nginx service failure.
The process action will tell ChaosToolkit to invoke a binary program that is installed in your system. This can be any program as long as it’s available on your machine and added to your system’s PATH.
To simulate a web server failure, we use the following command to send a quit signal to the Nginx container with docker exec webserver nginx -s quit
We can now rerun the experiment and see what happens:
# chaos run webserver-running.yaml
And this time, we should see the following output:
[... INFO] Steady state hypothesis: Ningx web server is available
[... INFO] Probe: server-must-respond
[... ERROR]   => failed: failed to connect to http://localhost:8080/: ....
[... WARNING] Probe terminated unexpectedly, so its tolerance could not be validated
[... CRITICAL] Steady state probe 'server-must-respond' is not in the given tolerance so failing this experiment
[... INFO] Experiment ended with status: deviated
[... INFO] The steady-state has deviated, a weakness may have been discovered
As expected, this time the system could not verify the ‘steady state’ hypothesis at the end of the experiment. We intentionally introduced a step in the method to stop the webserver but we didn’t teach the system how to recover from this event!
By default, the framework will validate the hypothesis before and after executing the method. The experiment successfully verified the hypothesis at the start but failed to do so after the method execution; hence the experiment is marked as deviated:
[... INFO] The steady-state has deviated, a weakness may have been discovered
6. Improve The System Resiliency
Good job! We’ve discovered a weakness in the system!
We followed the Principles of Chaos, formulated a hypothesis about the system ‘steady state’, created an experiment to verify the hypothesis, introduced a service failure event and discovered a weakness.
Now let’s see if we can teach the system how to recover gracefully.
Conveniently, Docker has a feature to automatically restart containers upon failure. We’re now going to rerun the webserver by adding the --restart always option:
# docker rm -f webserver
# docker run -d --name webserver --publish 8080:80 --restart always nginx
Now the webserver should automatically restart upon failure, but unfortunately, this operation will take a bit of time.
In our local machine, container restarts can happen in an instant, but if we were to run the service in the Cloud, this could take several seconds, and the experiment would now allow enough time for the service to recover between hypothesis verifications.
To work around this problem, let’s modify the experiment file webserver-running.yaml and add a short pause after the terminate-nginx-service action:
method:
  - type: action
    name: "terminate-nginx-service"
    provider:
      type: process
      path: "docker"
      arguments: "exec webserver nginx -s quit"
    pauses:
      after: 5
The pauses section will ask ChaosToolkit to wait 5 seconds before moving on to the next step. A few seconds should be enough for Docker to respawn the failing container.
Let’s rerun our experiment one more time:
# chaos run webserver-running.yaml
And this time, the hypothesis verification was successful both before and after the experiment execution!
To verify a restart really happened, we can run a docker ps and see that (in my machine) the container was created 9 minutes ago but was just restarted by Docker after the chaos experiment killed the service:
# docker ps
CONTAINER ID   IMAGE   CREATED         STATUS          NAMES
713811cd9437   nginx   9 minutes ago   Up 49 seconds   webserver
7. Cleanup
Once we’re done playing with this experiment, let’s remove the container we created so it’s not automatically restarted:
# docker stop webserver
# docker rm webserver
8. Conclusion
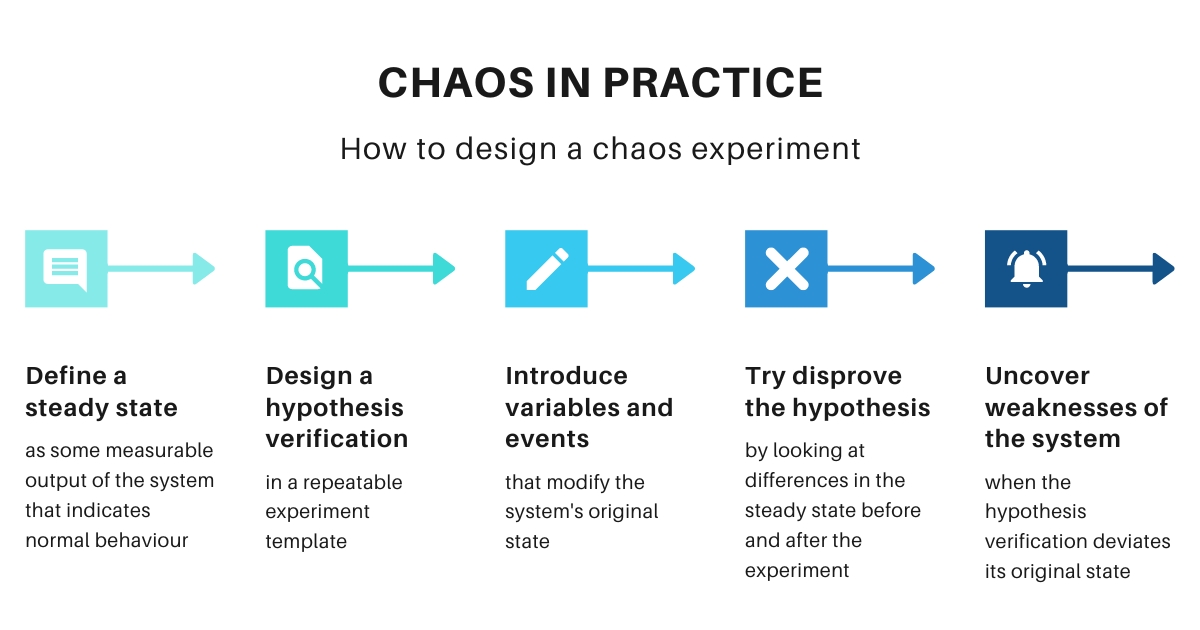
In this article, we created a simple Chaos Engineering experiment using ChaosToolkit. Even without setting up complex scenarios, we followed the Principles of Chaos and designed and executed a chaos experiment.
To summarise:
- Start by defining a steady state as some measurable system output (HTTP status
200) - Design a hypothesis verification and add it to the experiment
- Introduce variables and events that modify the system’s original state (stop the webservice)
- Try disprove the hypothesis by looking at differences in the steady state before and after the experiment
A working example of the experiment with the code shown in this article is available over on GitHub